Showing posts with label Tutorial. Show all posts

Thursday, October 18, 2012

Homemade Burger Recipe

Suddenly carving for Burger Bakar Kaw Kaw that I had last few month in Wangsa Maju. I'm a burger lover and I tasted quite many kind of burger such as the burger ramli , burger otai , burger special , burger apple, burger McD and etc. However , Burger Bakar Kaw Kaw will be the one I love the most although I tasted it for one time. The meat or so called "patty" are tender and juicy compare to the normal burger because the patty are homemade by the shop owner which included many kind of ingredients in it. Many people willing to line up just to tasted the Burger Bakar Kaw Kaw including me myself , although the line is long but the services was fast and people are keep coming every minutes non stop. People are Crazy or The Food is TastY?? HavE a BitE and yOu wIlL kNoW. More info about Burger Bakar  Kaw Kaw can be found HERE BURGER BAKAR KAW KAW

Note : The recipe bellow is serve for 1-2 pack
Today I want to share my own burger recipe (but after refer to some articles and blogs in the internet). Here are some basic ingredients to make burger patty.

1)1 Chicken Breast- Can change to meat if you like
2)1 Big Onion
3)3 Small Garlic
4)1 Egg
5)A tablespoon of Chili Powder
6)Salt
7)Sugar
8)Black Paper
9)Cooking Oil
10)Some Thai Basil

>Patty<
To make the patty first clean the chicken breast and minced it up. Put aside the minced chicken breast and take the Onion and dice it together with garlic. Put diced Onion , Garlic, Egg together with the chicken breast and mix it evenly. Next, add in one table spoon of chili powder , 1 table spoon of black paper , a pinch of salt and paper for the taste and not least chop fresh Thai Basil and add into the mixture. Mix again until it become evenly. Now shape the mixture into size that you prefer and ready to be cook.
Mix all the ingredient together

>Cooking method<
The best way to cook the patty is to grill it using charcoal. However there are an alternative way by using hot pan, it is more convenient if you don't have grill at home. First , put the frying pan on the stove and turn on the fire. Use low heat to cook the patty to make sure the meat cook evenly from the inside out. Add some oil into the pan and put the patty in. Cook the patty around 5-7 minutes for each side. After the patty is ready , take it out and serve it with Sesame Bun, chili sauce , black paper sauce and some tomato.
Fry for 5-7 minutes using low heat.
The time to cook depending on the size of the patty , if the patty is big then more time are  required to cook the patty

This is how it look like when it is almost cook.
Golden Brown Color

>Tadaa This is my Homemade Burger Kaw Punya<

Home Made Burger
The sauce I use is combination of Sarawak Black Paper Sauce + Kimbal Chili Sauce 
Cooking is fun. Happy Cooking~=)

Saturday, August 11, 2012

SSH in Windows 7(64bits)

Recently I have been working on a small project to setup a backup server which uses SSH protocol to secure the communication in network. It is not really as hard it look, you just need some times to find the way to configure it correctly. However I'm not gonna talk about how to setup backup server right now. In today post I will be guiding on how to install and configure SSH in windows 7(64 bits). For your information the configuration also have been tested in WINDOWS SERVER 2008 R2 as well and it work!!If you wish to configure SSH in WINDOWS XP you can visit here -->OpenSSH for windows(XP)

CopSSH is the software used in this tutorial. It is a FREE version opensource SSH installer for windows which is compatible with windows 7(64 Bits) operating system(OS). CopSSH is the integrated version of OpenSSH which is used as SSH in windows XP and the earlier windows OS. The function of both CopSSH and OpenSSH are the same , the only difference is CopSSH is compatibility with 64 bits operating system. 


Softwares
1)CopSSH can be download here or here
2)Putty.exe

Installation guide
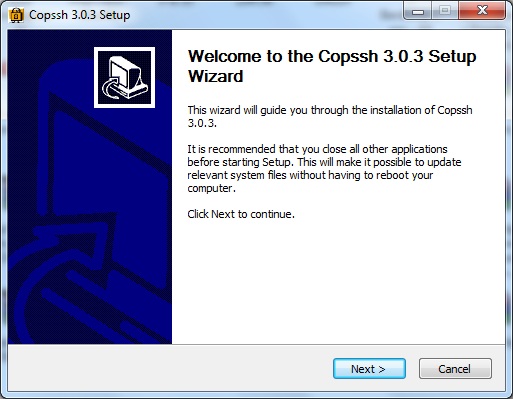
Step 1 : Download the CopSSH from one of the link above, extract and double click to start the installation.

Step 2 : Click "Next"


Step 3 : Click "I Agree" to accept the license agreement
Step 4 : Choose Install Location and click "Next"


Step 5 : Type in your existing user account(e.g administrator) and password and click Install


Step 6 : Click "OK" if the popup windows below appear during installation


Step 7 : Installation complete, click "Close"


Step 8 : Go to start > in search box type "services.msc" and click "Enter"


Step 9 : Find "Openssh SSHD", make sure it is "Started" and set to "Automatic" Startup Type.
If it doesn't, click "Start" to start it up.


Step 10 : Download putty.exe and test the SSH
You can try to run putty.exe from another machine connected to the same network to test the SSH installed in your windows 7. The other ways is to run putty.exe from your windows 7 and SSH to the local machine.
Type in address as 127.0.0.1 , port 22 and click Open

When a command prompt windows appear ,type in your username and password.
Thats It!!
Please correct me if there are mistakes made in this tutorial. Thank You!!

Sunday, August 5, 2012

OpenSSH for Wiindows(XP)

Secure Shell (SSH) is a network protocol for secure data communication, remote shell services or command execution and other secure network services between two networked computer that it connect via a secure channel/tunnel over an insecure network: a server and a client (running SSH server and SSH client programs)."Refer from wikipedia".

OpenSSH is a FREE version of the SSH connectivity tools that is used to secure data communication between two network using encryption method. OpenSSH usually used in Linux box such as Ubuntu, Fedora, and other open source Operating System. SSH are usually used with programs such as Secure Files Copies (SCP) and Secure Files Transfer (SFTP) form one machine to another machine.


In this post I will guide you how to install and configure OpenSSH in Windows PC (Windows XP). There are two softwares used in this tutorial which are as bellow :

1)OpenSSH for windows (Install in Windows XP)
2)Putty.exe (To test the SSH)


Installation Guide (Tried it on Windows XP)
Step 1 : Download OpenSSH for windows here or here
Step 2 : Extract the files and double click to install
Step 3 : Click Next

Step 4 : Accept the license agreements and click Next
Step 5 : Choose the components and click Next
Step 6 : Choose Install Location and click Next
Step 7 : Click Install
Step 8 : If the message bellow appear during the installation ,just click OK
Step 9 : Installation Successful, click Finish
Step 10 : Start the OpenSSH services
Testing the SSH configuration
Step 1 : Download the latest putty.exe from here
Step 2 : Run putty.exe
Step 3 : Type in the hostname/IP address as 127.0.0.1 and port 22 and click Open
Step 4 : Key in the Username and Password 
Thats it!! 

Hope this little info is helpful.
Wait for the next post in how to install and configure SSH in Windows 7(64bits).

Thursday, January 19, 2012

Collar T-shirt Templates Photoshop

Hello,today just want to share something with you guys.In this two three days I have been playing with my photoshop cs5 to design a T-shirt for my thai community in my university.During the process, I'm having some problem to design the t-shirt because I'm new with photoshop.So what I do is ask some of my friends for help but as a result they recommend me to ask Mr Google.So everyone is depending on Mr Google nowadays including me myself..Haha..But somehow he indeed provide me some idea how to start with my project.

After searching for a while,then I have found what I'm looking for.Its is the templates of a t-shirt.You may wonder what is a templates of a T-shirt right?Let me tell you,it is the basic templates that illustrate the real T-shirt that you want to design.With this templates you can edit to change the color,add words,add design,and many more.The most popular templates used to design T-Shirt is the Vector templates,which give the best result in term of quality of the T-shirt.Vector templates uses Adobe Illustrator(AI) to design.However due to limited knowledge about AI,I just stick with photoshop for now.

Here are some of the picture of the design.

Sample 1(V-Neck T-Shirt)

Sample 2(Collar Polo T-Shirt)
To get the templates for the sample above click the link below

Sample 1 : Mediafire.rar
Features : editable colour
File type : .psd

Sample 2 : Mediafire.rar
Features : editable colour(on the shirt)
:editable colour(on the collar)
File type : .psd

p/s : all the templates are free of charge.Use it wisely.Thank You.

Monday, December 12, 2011

mY DIY (how to change ribbon for spiro)

Hello,its been a century since my last post right..miss me??XD
Being so busy with study,test,activities, and assignments recently.That's why no time to update my own blog("alasan je lebih").But since today is HOLIDAY in SELANGOR,so I'm taking this chance to relax and put away my homework and start update my blog.*If not ,for sure this blog will be full of spider web*.=D

Haih,life is hard without handphone.My sony erricsson spiro phone spoil last friday ,so cant't receive any call and reply any SMS(usually also same only~haha).But still need it to know the time and to set the alarm clock.What happen to my phone actually??Well the screen blackout because of the "ribbon" connected the screen and the circuit "koyak".I'll show the picture below.


Above is the picture of ribbon.
The red circle show the part that are "koyak".

One small part of it "koyak" but it affect the whole screen and the button.Since I'm run out of money to take it for repair ,so I decide to repair it myself("Bunyi cam power~haha").Before start to repair first must find the spare part first,so I went to the nearest shopping center(The Mines) to look for the spare part.Well it took me only 10 mins to find the spare part BUT it took my one week pocket money to buy one ribbon.Dem expensive ,around RM45 for one ribbon.Is It I'm being cheated or what??Either way I still need to buy it so doesn't care too much and bough it(Heart pain~pain pain pain~haiz).


This Is the new Ribbon I bought
cost me RM45(%^##**#^&^*^#!)

So now we have the spare part already,I will teach you how to DIY replace the ribbon below.Look and read at the steps carefully so that your phone will be in a good condition.

First prepare the tool : phillips screwdriver ,ATM card/credit card.

Step 1

Remove the back cover,battery pack and also the sim card.
follow by,removing the screws from the 4 position mark with red circle using the phillips screwdriver.


Step 2

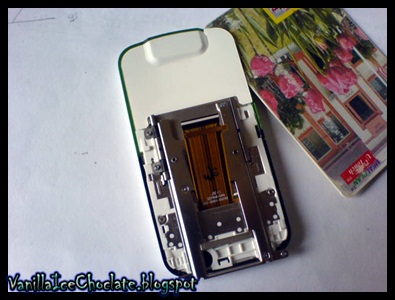
Slide the phone until it become like the picture above.You will see a ribbon attach the screen and the other body of the phone together.Now you must detach the ribbon from its ribbon connector(also known as zif connector).
see picture below

Use your nail to unlock the brown color ribbon lock(also known as latch which opens and closes on a hinge) shown by the red circle.After unlock pull the ribbon out slowly and separate the screen and the body.

Step 3

Use an ATM card or credit card to remove the white color plastic.Peel it slowly so that you can paste it back later on.
After peel it off then it become like this


Step 4

Remove the screws from the 4 position mark with red color circle.

Step 5

For this step you must push your ATM card around the the join until it loose.Start from the top and work your way around until the thing get loose.
and become like this


Step 6

The two white clip mark with red color circle hold the keypad membrane.Release the clips and flip the keypad membrane over
and become like this

Same as step 2,Use your nail to unlock the brown color ribbon lock(also known as latch which opens and closes on a hinge) shown by the red circle.After unlock pull the ribbon out slowly.

Step 7

After remove the old ribbon replace it with the new one and reverse all the steps one by one starting from step 6 --> step 5 --> step 4 --> step 3 --> step 2 -->step 1

This is how I done it~It takes me less than 30 minutes to do it.So why bother take it for repair if you can DIY.

Lesson that I get is ,take good care of your things.It may not seem expensive the time you bought it,but when come to repair and spare part it can cost you a lot.Love your belongings ,take good care of it,it really worth when you can use your belonging in good condition.

tQ for you time
see you next time

Sunday, August 21, 2011

Internet Download Manager v6.07 Built 8 Final[Full]


Yes,is time to update again~today my entry is about software called internet download manager.It is a common software that are use widely by downloader to download file from the internet.IDM(Internet Download Manager) provide user 5x more download speed compare to other downloader.IDM can be use for direct download such as from mediafire,filesonic,hotfile,megaupload and many more~I have been using IDM for more then 2years now~for more info about IDM click here "Internet Download Manager".


File : IDMv6.07.exe + Patch + Keygen
Size : 4.36Mb


Download Link :
MEDIAFIRE : tinypaste.com
password
: vanillaice


extract with : WinRAR

Today I will show how to install "Internet Download Manager v6.07 Built 8 Final[Full]" in your windows.

*NOTE : Please turn ur ANTIVIRUS off before installing IDMv6.07.

After download the .rar file~Extract it by using WinRAR to ur desktop or any folder you like.
Then follow the instruction below step by step :

How to install??

Step 1 : Double Click the idm607.exe file

Step 2 : Click Next

Step 3 : Click Next again


Step 4 : Choose Destination Folder that you want to install your IDM and Click Next


Step 5 :Click Next


Step 6 : Just Continue to Click Next


Step 7 : Click Finish


Yes,If you manage to do until here You are half way to finish the installation.
*If your computer ask you to REBOOT/RESTART just ignore it*

REMINDER :

Lets continue with patching :
*Before patching make sure that your IDM is not running~close it if it still running*

How to patch??

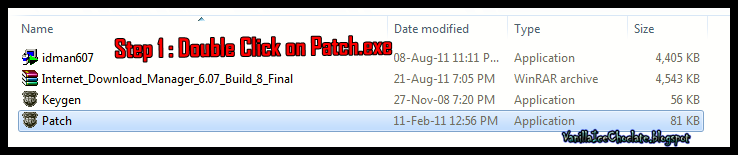
step 1 : Go to the Folder you extracted the IDM then double click patch.exe


Step 2 : When this show up,Click the "patch" button.


Step 3 : A new window will pop up like below
Well,you have to follow the step carefully.In this step you must search for the idman.exe in the "Destination Folder" you installed you idm earlier.Its usually located on drive C:
example : C:\Program Files (x86)\Internet Download Manager (In window 7)

After found the idman.exe click on it then Click Open

Step 4 : If you see this message,then you patching is complete~Close the patch~


Now you check whether your IDM has been registered or not..

1.Go to start and click Internet Download Manager


2.On your IDM window Click Registration.If your IDM now is same as in the picture then you now can enjoy your new IDM~


Do comments if you have problem with the installation.
TQ
Have a nice day.
Peace no war ^^v