
Hello,its been a century since my last post right..miss me??XD
Being so busy with study,test,activities, and assignments recently.That's why no time to update my own blog("alasan je lebih").But since today is HOLIDAY in SELANGOR,so I'm taking this chance to relax and put away my homework and start update my blog.*If not ,for sure this blog will be full of spider web*.=D
Haih,life is hard without handphone.My sony erricsson spiro phone spoil last friday ,so cant't receive any call and reply any SMS(usually also same only~haha).But still need it to know the time and to set the alarm clock.What happen to my phone actually??Well the screen blackout because of the "ribbon" connected the screen and the circuit "koyak".I'll show the picture below.
 Above is the picture of ribbon.
The red circle show the part that are "koyak".
One small part of it "koyak" but it affect the whole screen and the button.Since I'm run out of money to take it for repair ,so I decide to repair it myself("Bunyi cam power~haha").Before start to repair first must find the spare part first,so I went to the nearest shopping center(The Mines) to look for the spare part.Well it took me only 10 mins to find the spare part BUT it took my one week pocket money to buy one ribbon.Dem expensive ,around RM45 for one ribbon.Is It I'm being cheated or what??Either way I still need to buy it so doesn't care too much and bough it(Heart pain~pain pain pain~haiz).
 This Is the new Ribbon I bought
cost me RM45(%^##**#^&^*^#!)
So now we have the spare part already,I will teach you how to DIY replace the ribbon below.Look and read at the steps carefully so that your phone will be in a good condition.
First prepare the tool : phillips screwdriver ,ATM card/credit card.
Step 1

Remove the back cover,battery pack and also the sim card.
follow by,removing the screws from the 4 position mark with red circle using the phillips screwdriver.

Step 2
 Slide the phone until it become like the picture above.You will see a ribbon attach the screen and the other body of the phone together.Now you must detach the ribbon from its ribbon connector(also known as zif connector).
see picture below
 Use your nail to unlock the brown color ribbon lock(also known as latch which opens and closes on a hinge) shown by the red circle.After unlock pull the ribbon out slowly and separate the screen and the body.
Step 3
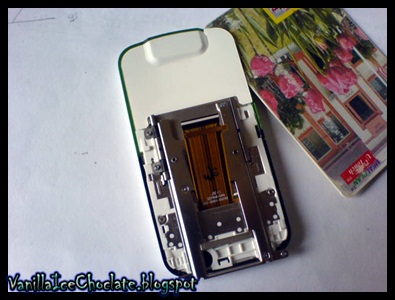 Use an ATM card or credit card to remove the white color plastic.Peel it slowly so that you can paste it back later on.
After peel it off then it become like this

Step 4
 Remove the screws from the 4 position mark with red color circle.
Step 5
 For this step you must push your ATM card around the the join until it loose.Start from the top and work your way around until the thing get loose.
and become like this

Step 6
 The two white clip mark with red color circle hold the keypad membrane.Release the clips and flip the keypad membrane over
and become like this
 Same as step 2,Use your nail to unlock the brown color ribbon lock(also known as latch which opens and closes on a hinge) shown by the red circle.After unlock pull the ribbon out slowly.
Step 7
After remove the old ribbon replace it with the new one and reverse all the steps one by one starting from step 6 --> step 5 --> step 4 --> step 3 --> step 2 -->step 1
This is how I done it~It takes me less than 30 minutes to do it.So why bother take it for repair if you can DIY.
Lesson that I get is ,take good care of your things.It may not seem expensive the time you bought it,but when come to repair and spare part it can cost you a lot.Love your belongings ,take good care of it,it really worth when you can use your belonging in good condition.
tQ for you time
see you next time